Posts

Showing posts from July, 2020

Christmas Cork Board Project 4 @SOYL CIJ

Image
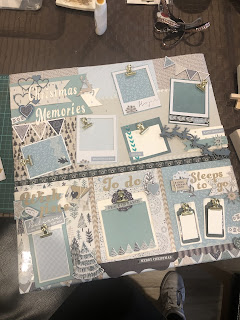
Hello lovers of all things craft this is my final design for the Christmas in July ‘Scrap of your Life’ event. I hope it inspires you to create your own projects. I came up with this design because at Christmas I like to decorate the house with everything Christmas. I purchased a 42cm x 42cm cord board from Kmart.  I used Kaisercraft ‘winter wonderland’ to line the board after I divided it up with see through washi take.  After I lined this board with a variety of matching papers I hand cut some ribbon ends and layered them up with 3D dots. I had some titles cut out in a variety of sizes and fonts to label each section if the board. You could use  stickers if you didn’t have dies. There is a ‘sleeps to go’ section for children to count down, ‘to do’ lists (shopping lists and things to remember for planning your Christmas), Santa letters/ wish lists from the kids so they can be sent to the North Pole. The top section can hold past and present photo memories at Christmas times. Bulldo

Festive Smiles Project 3 SOYL @ CIJ

Image
To create this scrapbooking page I have used stencillling, texture paste, embossing, distresscrayon.  I used cut files by Gwen for the title ‘bright’ and large and small geometric hearts. The ephemera I used was First Noel by Kaisercraft and the black and whites from 6x6 winter wonderland paper pad by Kaiser.  I used a stencil with texture paste to create dimension on the background of black stippled cursive. I then embossed this with Aztec gold powder. I embossed the word ‘ bright ‘ with Aztec gold powder as well. Either geometric hearts I backed the hearts with a variety of black and white papers.  I embellished the pages with sequins , seed beads, gold sparkle enamel dots and more ephemera.  I enjoyed the bling on this page and reminded me of festive smiles. Happy crafting Mel x

Mini Canvas Name Easel Project 2 @ SOYL CIJ

Image
Hello all you crafters thanks for visiting to see my next project.  I designed this project because at Christmas I like to create a festive table and give each guest a special place at our table. I painted the small canvas In Kaisercraft ‘eggshell’ acrylic paint.  Dried it then used ‘speckled’ stencil with distress ink ‘ speckled egg’ then gave it a spritz with the same colour distress oxide. Stamped Ranger ‘faded jeans’ distress ink in top corner with a diamond stamp. Add caption I then used Kaisercraft ‘winter wonderland’ paper and sticker pad and ephemera to arrange some wooden embellishments, twine, sequins, seed beads, glitter. You could use stickers to write someone’s name or you could write it with a permanent marker then cut it out and lift it up with 3D dots.  Im hoping someone named ‘Joy’ turns up at my Christmas feast!  Thankyou for vis iting !!!! Happy crafting  Mel xx

A Merry Frame @SOYL CIJ

Image
This idea came about when I decided I wanted to display a cute family picture (2x3 inch photo) for Christmas . I used speckled egg oxide ink pad to create two circles for the background. The papers I used were from Kaisercraft ‘winter wonderland’ I created a background using blue glitter paste and a Tim Holtz tag circle stencil which I used in both corners of this frame to stencil the glitter.  I used a felt tip pen and hand drew around the circles to add definition and then started to layer up the ephemera from ‘winter wonderland’ as well stickers with Christmas sentiments on them.  I painted in (speckled egg ink) some chipboard hearts that I separated and layered under a car board backed photo. I hand drew a border here also.  I finally took the cardboard frame from the photo frame and placed it over the scrapbooking I had done not worrying to much if it overlapped the frame. I finished this project with sequins, painted wooden elements which blended in with the colours I used.  Than

The Beginning

Image
The background was a range of hand painted watercolour shapes which I layered under the photo. From the Kaisercraft Amethyst range I painted the titles and layered them around the diamond photo. When I use a black and white photo the page can be very bright. I will blend in all the bits and pieces on the page.  I hand wrote love words with Vicki Boutins water colour brushes and painted some feathers. I used a stencil with blue ink to look like blotches on the background. I balanced the page by moving elements around the page.  The colours are never the same in every watercolour you will ever paint. Allowing your pages to never be alike.  Adding a couple of paper roses adds dimension to this pages and a variety of words that relate to love.  The meaning of this page is love and when my son looks back I know he will see what that looks like on a page.

Beautiful YOU

Image
I used Vicki Boutin water colour pens to create this background. I was very generous with extra water sprays to really water down the pain. I painted a few matching embellishments in muted water colour blues and pinks. I was able to use a grey ink on a stencil very lightly. Doodling in black fine marker brings that colour out of the photo. I’ve used a doily and a range of Jilibean ephemera. Wooden and twine and watermelon coloured jewels. Bringing colours out of photos are things I love to do. This page is a contrast of random watercolour blotches and controlled horizontal stripes.

Lest we Forget ‘2019’

Image
Lest we forget ‘2019’ This page was done with red watercolour paints. I painted the poppy stamp and stamped it many times then fussy cut each one I coloured each in with water down blue and red colour. I used a poppy stemmed ie cut and coloured it with Tim holtz distress ink (red) . I used some speckled egg on the background with a brick stencil in different areas of the page.  I often use a thin black marker to define the background, stamps and edges of the page. It ties the page into a rather darkish photo. The leaves were hand painted and lifted on the layout with 3D dots. I hand painted the border edge with water colour then used a ruler to mark in the page edges.